(This article is based on Principle #5 in the Swift Mind Freedom method.)
Sometimes, you might have a feeling that you will never finish your to-do list. And you know what? It might be true. It might be entirely possible that your to-do list is indeed impossible to finish. This happens when you place non-tasks on your to-do list.
You see, there are two types of items that might appear on your personal organizer lists: tasks and non-tasks.
Tasks are actionable. Tasks are actions you decided to do.
Non-tasks are non-actionable. Non-tasks are ideas, notes, thoughts, reference-material and information.
It is very important to understand the difference between “actionable” and “non-actionable” (tasks and non-tasks), because if you don’t, it will be absolutely impossible to finish your to-do lists.
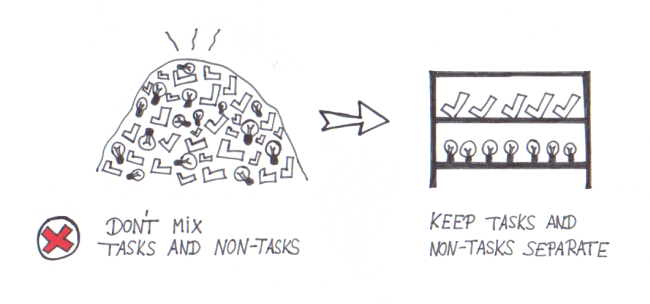
You should never place non-tasks on a to-do list among tasks. Why? Because you can’t “do” non-tasks, so they just sit there cluttering your to-do list, making it cumbersome to read – and impossible to finish!
To-do lists are for tasks you can do. Non-tasks belong in a separate list or place.

Since we all have both tasks and non-tasks, I strongly recommend having at least 2 separate lists.
- One or more to-do lists with tasks (actions)
- One or more lists with non-tasks (ideas and information), and as many collections of notes, memos and reference material you need. Again, all this should be kept separate from your to-do list with tasks.
Note: Ideas are not tasks because you’ve not yet decided to do them, so they are not yet actionable. But if you decide to take action on some idea, it becomes a task.
How to separate tasks and non-tasks in Swift To-Do List
I will now show you how you can separate your tasks and non-tasks in Swift To-Do List.
Just do this -
- Make sure that you have an “Ideas List” created in the to-do list tree. You will be moving all non-tasks into it. To create it, use menu Tree – Add To-Do List, and in the Add To-Do List window, check “List“. Then name the list “Ideas List” and press OK.
- Now, go through all the tasks you’ve captured up to this point, and whenever you encounter a non-task, move it to the Ideas List. You can simply select the non-task and using mouse, Drag and Drop it to the Ideas List in the to-do list tree. Or, you can select it and press Ctrl+X to cut it, then click the Ideas List, and press Ctrl+V to paste it. Tip: You can do both these operations with multiple items at once.
- Now back to the information you put into “Ideas List”. If you have lot of non-tasks, you might want to create multiple “Ideas Lists” and categorize them by project or topic if possible. (You can just Drag and Drop items to other lists or to-do lists in the tree.)
And that’s it! Congratulations! You’ve separated your tasks and non-tasks. Isn’t that better? Now, it should be actually possible to “finish” your to-do list.
Also, here is an important distinction: At times you will have information, reference material or notes that are directly connected to a specific task. You want this information handy when you look at the task and ready to do it. Put this information into the Notes section of that particular task, instead of keeping it isolated on the idea list or somewhere else. This way, when you work on the task, you will immediately see the important related information, and it also won’t unnecessarily clutter your Ideas List.


