|
Outlook 2007, 2003 |
  
|
|
Outlook 2007, 2003 |
|
You can import tasks or calendar items from Outlook (all versions). To do that:
| 1. | Export data from Outlook to a file in Comma Separated Values (CSV) format. |
| 2. | Then use File - Import Wizard in Swift To-Do List 8 to import that exported file. |
Here is a step-by-step guide for importing from Outlook 2003 and 2007 into Swift To-Do List 8:
Step 1: Start Outlook 2003 or 2007
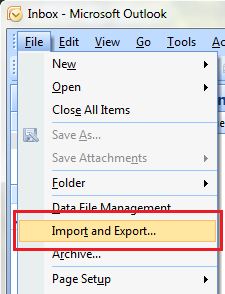
Step 2: Use "File - Import and Export" in Outlook
This will open the Import and Export wizard in Outlook.
Step 3: Select "Export to a file"
... then click Next.
Step 4: Select "Comma Separated Values (Windows)"
... then click Next.
Step 5: Select "Tasks"
... then click Next.
Step 6: Save the CSV file
No other changes are necessary. To finish the wizard, save the CSV file to some place where you can find it easily (eg. on your desktop). You can exit Outlook now.
Step 7: Open Swift To-Do List 8
Open Swift To-Do List 8 and use File - Import Wizard. This wizard has 4 easy steps.
| ► | In step 1, browse for the file you've just exported out of Outlook. |
| ► | You usually do not have to change anything in step 2. |
| ► | In step 3, you usually do not have to change anything either. The imported fields can be mapped in this step. Most fields will be mapped automatically, but you can do some manual changes. To do that, just click the field names in the Swift To-Do List 8 column. |
| ► | For example, Outlook uses task property "Category", but Swift To-Do List 8 has no "Category" property - you can either map the "Category" field to "Type" (which serves the same purpose), or you can map it to "To-Do List" to create a new to-do list for every "Category" of the imported tasks (Don't forget to check "Create Sub-To Do Lists" in step 4 in that case). |
| ► | The import is quite flexible, so you can customize the mapping to your full satisfaction. |
| ► | If Swift To-Do List 8 doesn't recognize the date formats, click the Field Formats... button to specify the date formats of the imported file. |
| ► | In step 4, select the target to-do list in which the newly imported tasks should be placed. |
| ► | If you check "Create Sub To-Do Lists", then new to-do lists will be created and the imported tasks placed into them, otherwise, all imported tasks will be placed into a single to-do list. (One of the imported fields needs to be mapped to "To-Do List" if you want to use this option.) |
And that's it - click Finish and relax while your tasks are imported, you are done!