Swift To-Do List Blog

How to get organized, how to be productive, Swift To-Do List tips and tricks

Is your to-do list impossible to finish?

(This article is based on Principle #5 in the Swift Mind Freedom method.)

Sometimes, you might have a feeling that you will never finish your to-do list. And you know what? It might be true. It might be entirely possible that your to-do list is indeed impossible to finish. This happens when you place non-tasks on your to-do list.

You see, there are two types of items that might appear on your personal organizer lists: tasks and non-tasks.

Tasks are actionable. Tasks are actions you decided to do.

Non-tasks are non-actionable. Non-tasks are ideas, notes, thoughts, reference-material and information.

It is very important to understand the difference between “actionable” and “non-actionable” (tasks and non-tasks), because if you don’t, it will be absolutely impossible to finish your to-do lists.

You should never place non-tasks on a to-do list among tasks. Why? Because you can’t “do” non-tasks, so they just sit there cluttering your to-do list, making it cumbersome to read – and impossible to finish!

To-do lists are for tasks you can do. Non-tasks belong in a separate list or place.
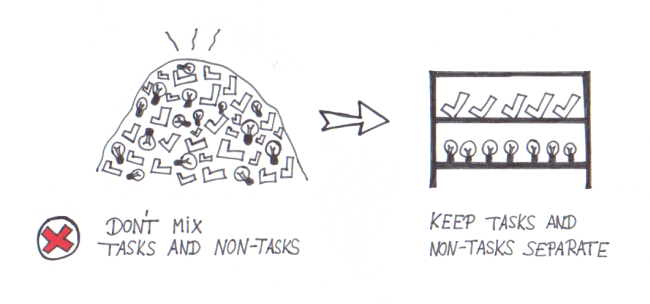
To get organized, keep your tasks and non-tasks separate

Since we all have both tasks and non-tasks, I strongly recommend having at least 2 separate lists.

  1. One or more to-do lists with tasks (actions)
  2. One or more lists with non-tasks (ideas and information), and as many collections of notes, memos and reference material you need. Again, all this should be kept separate from your to-do list with tasks.

Note: Ideas are not tasks because you’ve not yet decided to do them, so they are not yet actionable. But if you decide to take action on some idea, it becomes a task.

How to separate tasks and non-tasks in Swift To-Do List

I will now show you how you can separate your tasks and non-tasks in Swift To-Do List.

Just do this -

  1. Make sure that you have an “Ideas List” created in the to-do list tree. You will be moving all non-tasks into it. To create it, use menu Tree – Add To-Do List, and in the Add To-Do List window, check “List“. Then name the list “Ideas List” and press OK.
  2. Now, go through all the tasks you’ve captured up to this point, and whenever you encounter a non-task, move it to the Ideas List. You can simply select the non-task and using mouse, Drag and Drop it to the Ideas List in the to-do list tree. Or, you can select it and press Ctrl+X to cut it, then click the Ideas List, and press Ctrl+V to paste it. Tip: You can do both these operations with multiple items at once.
  3. Now back to the information you put into “Ideas List”. If you have lot of non-tasks, you might want to create multiple “Ideas Lists” and categorize them by project or topic if possible. (You can just Drag and Drop items to other lists or to-do lists in the tree.)

And that’s it! Congratulations! You’ve separated your tasks and non-tasks. Isn’t that better? Now, it should be actually possible to “finish” your to-do list.

Also, here is an important distinction: At times you will have information, reference material or notes that are directly connected to a specific task. You want this information handy when you look at the task and ready to do it. Put this information into the Notes section of that particular task, instead of keeping it isolated on the idea list or somewhere else. This way, when you work on the task, you will immediately see the important related information, and it also won’t unnecessarily clutter your Ideas List.

Related Posts:

stdl

Swift To-Do List 11

The ultimate to-do list and notes software for Windows.

Swift Mind Freedom

Swift Mind Freedom

Swift Mind Freedom is a method of using Swift To-Do List for
instant relief, total control and super efficiency.

Learn 11 powerful principles to get and stay organized
and stress-free.

Each of the 11 principles comes with a fun, hand-drawn illustration.

Swift Mind Freedom method is easy, simple, fun, and gives you
fast results.

How to use Due Dates in your to-do list correctly

When should you set Due Dates for your tasks?

Well, I have 2 recommendations:

You want to use Due Dates when you have a task that must be done on a specific day – e.g. it’s an appointment, event, or it’s an important deadline. I also recommend you to set a reminder for all such tasks.

And -

Unless you are 100% determined to do something on a specific day, I think that you shouldn’t use arbitrary (made up) Due Dates in most situations. It is usually more efficient to prioritize such tasks accordingly.

Start Dates and Due Dates should therefore be used sparingly. If you use a Start Date or a Due Date, it should be absolutely necessary to do the action on that particular date, or, you should be 100% committed to doing it.

So in practice, most of your tasks will probably have no Due Date. In fact, you don’t have to use Due Dates at all and just use reminders for the few tasks that are date-critical.

Here’s an exception to this rule. If you believe that you prioritize your tasks correctly, but still discover that you seldom do what you actually want to do on any given day, you might consider utilizing arbitrary Due Dates, especially if you are fairly self-disciplined. Arbitrary Due Dates can act as a secondary (or primary) prioritizing method. Here’s how it works -

You can use Due Dates to mark (plan) your tasks for today and tomorrow. I don’t recommend planning things too far ahead (more than a week ahead), because you probably won’t be able to keep the “schedule” up-to-date.

Advantage of planning your tasks for a given day beforehand is that you will tend to get more done. You will try to get the scheduled tasks done, because you know that tomorrow, you need to do other tasks. Also, when planning with Due Dates, you are less likely to get distracted by new incoming tasks in favor of your planned tasks.

So, in practice, you can choose the tasks that you want to do today and set today Due Date to them. Then pick the tasks you want to do tomorrow, and set tomorrow Due Date to them. Etc. But don’t plan more than a week ahead.

Inside each day, you can then prioritize the tasks using your current prioritizing system. In Swift To-Do List, click the Due Date column, then hold the Ctrl key and click the Priority column. That way, your tasks will be sorted by Due Date first and by Priority second. You can also use the small calendar below the to-do list tree to quickly view only today’s tasks with 1 click.

Beware this trap though: When you use both necessary and arbitrary Due Dates, the tasks that really must be done on a specific day might get lost among the tasks you would just like to do on a specific day. As a possible solution, insert a “[DATE CRITICAL]” prefix into the task names of tasks with the non-arbitrary Due Dates.

One final tip: If you want the expired Due Dates to be automatically set to current date, you can use menu File – Options, and in the Task-View section of the Options window, check “Roll-over Due Dates“. With this option enabled, when you won’t finish a task you’ve planned for today, it will automatically move to tomorrow.

Related Posts:

stdl

Swift To-Do List 11

The ultimate to-do list and notes software for Windows.

Swift Mind Freedom

Swift Mind Freedom

Swift Mind Freedom is a method of using Swift To-Do List for
instant relief, total control and super efficiency.

Learn 11 powerful principles to get and stay organized
and stress-free.

Each of the 11 principles comes with a fun, hand-drawn illustration.

Swift Mind Freedom method is easy, simple, fun, and gives you
fast results.