When you use a to-do list software (such as Swift To-Do List) for some time, you will end up with many captured tasks.
If you feel that you could organize your tasks better, you probably could. The easiest way of doing that is to categorize your tasks into multiple to-do lists.
One way of doing that is separating your work-related and personal tasks.
Today, I will show you exactly how to do that (step-by-step). You will also learn how to additionally categorize your tasks by areas/projects, and how to view all work-related or personal tasks at once.
Separating Work and Personal tasks
You can create as many to-do lists as you need in the to-do list tree. You might have already created several to-do lists – in that case, you can use the following information for inspiration to refine your current categorization.
Now, let’s create two new top-level to-do lists, “Work” and “Personal” and then divide all your existing tasks among them.

Here are the steps to separate your personal and work tasks:
- Use menu Tree – Add To-Do List to create a new to-do list named “Personal”.
- Use menu Tree – Add To-Do List to create a new to-do list named “Work”.
- Click your current to-do list (where your tasks are) to view it, and Drag and Drop each personal task to the new “Personal” to-do list, and each work-related task to the new “Work” to-do list. Dragging and Dropping tasks works the same as when you move files to a folder in Windows. If you don’t know how to do this, here is a video (moving tasks to a different to-do list is shown in about halfway the video). You can also Cut and Paste the tasks instead of using Drag and Drop.
- Finally, if your current to-do list is empty now, you might want to delete it (right-click it, and select Delete), so you have just the two new lists – “Work” and “Personal”.
Congratulations! You’ve successfully separated your personal and work tasks.
Organizing your work tasks by areas
Now, let’s setup several to-do lists based on areas/projects of your work tasks.
- When it comes to your work tasks, ask yourself: What are the 3-5 main areas (or projects)?
- For each area/project where it makes sense to you, create a new sub-to-do-list under the “Work” to-do list. To do that, right-click the “Work” to-do list and select Add Sub To-Do List in the popup menu. Name each new sub-to-do list based on the area or project (e.g. “Marketing”, “Reports”, “Presentations”, “Clients”, “Project Omega”, etc.)
- Move tasks that belong to a certain area/project to their new home. Again, you can use Drag and Drop and your mouse, or Cut and Paste.
Tip: You can also Drag and Drop the actual to-do lists and memos around the tree using your mouse too, to re-order and organize them.
The result might look like this:

You can of course do the same for your personal tasks now.
Viewing tasks from multiple lists at once
Sometimes, it is useful to view all tasks at once, so you can get a big picture perspective.
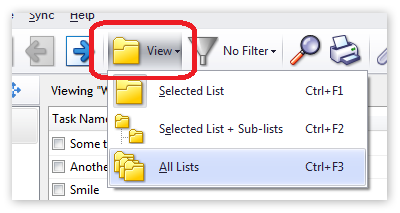
Now, if you need to view all tasks at once, you can click the big View button in the main toolbar, and select All Lists:

To view only the selected to-do list again, press the View button again, and click Selected To-Do List.
Here is the really useful thing though –
If you want to view all your work-related tasks, you can select the Work to-do list in the tree, and then, click the View button and click Selected List + Sub-lists. This will display all tasks from the Work to-do list, and also all tasks from all its sub-lists.
Likewise, if you want to view only personal tasks, you can select the Personal to-do list in the tree, and again, make sure the view mode is set to Selected List + Sub-lists.
So now you can view only one particular to-do list, or all tasks at once, or only work-related tasks, or only personal tasks. Quite useful, isn’t it?
Another way of reducing complexity and making your list shorter is to use the Hide Until feature.


