Swift To-Do List Blog

How to get organized, how to be productive, Swift To-Do List tips and tricks

2 rules of naming tasks correctly

I will share with you 2 rules of naming tasks correctly. If you apply them, your to-do list will empower you to take action. If you don’t, your to-do list will cripple your ability to move forward.

I’ve already talked about the importance of writing everything down immediately to maintain a peace of mind. I’ve also talked about the importance of consolidating your to-do lists and keeping everything in one place. These two things indeed are the key – but once you master them, there is another thing you can do to make your to-do lists super-useful and empower you to take more action.

Tasks are actionable items. They are actions that need to be taken. And it’s too easy to forget this when writing your tasks down. The words you use to write a task matter a great deal.

You should always use actionable task names, which contain specific actions – verbs.

In the task name, always write the action you need to take to move the task forward, and be as specific as possible.

Two rules of naming tasks are:

  1. All task names should contain an action (begin with a verb, and ideally describe the next step).
  2. All task names should be as specific as possible

So, for example, don’t just name a task “Report”. A slightly better way to name it could be “Finish the report”, but it’s still not the best wording because it’s not specific enough. It’s vague. It doesn’t tell you exactly what to do to finish the report, and which report.

Here’s a better task name: “Write the final summary in the Q4 Report to finish it”. That’s pretty specific and actionable. You know exactly what to do to move the task forward, and exactly which report the task relates to.

Or, you could name it like this: “Finish the Q4 Report” and add a subtask named “Write the final summary” – the subtask still contains the next action.

Why is this important?

When we look at our list and see just “Report”, we have no idea what to actually do or even a hint on how to start. We have to stop and figure it out, which is very inefficient, but also demotivating and creates a friction between us and the task.

It is much harder to get going when the task names are not actionable and not specific. All our brain sees when we look at vague task names is “This task is huge! Too much work! Too much thinking! Let’s do something else!” In such situations, we spend too much valuable energy trying to get started on the task. This opens the door for procrastination (social media, news, web-surfing and pointless busywork).

Try to use specific, actionable wording right when you first write the task down. In that moment, you probably know what the actual specific action is. So write it down. Don’t force yourself to figure it out later, when you don’t have all the relevant information on your mind anymore. When you start using specific actionable task names, you will save yourself a lot of time and energy. It’s just smart.

Task names which are specific and contain the action you want to take are:

  • More motivating and less intimidating
  • Easier for you to get started on
  • Saving you valuable time and mental energy
  • Less likely to be procrastinated on

Best of all, it takes you just a very little effort in the moment you are writing the task down for the first time. By writing the task in a way so it’s obvious what the next specific action is and what precisely needs to be done, you will get all the benefits above.

Here are a few examples of good and bad task names:

Bad task name Good task name
Jim Call Jim and ask about the quote
Paper Finish the summary of the white paper and send it to Peter
Chair Order online 5 new caster wheels for my office chair
Annual meeting Prepare my presentation for the annual meeting
Letters Sign and mail the letters to our 5 VIP partners


Here’s how you can apply this right now to experience the difference yourself: Open your to-do list, and re-word some of your most important tasks, so they contain the next action, and are as specific as possible.

(This post is an edited excerpt from my new e-book Swift Mind Freedom).

Related Posts:

Swift Mind Freedom

Swift Mind Freedom

Swift Mind Freedom is a method of using Swift To-Do List for
instant relief, total control and super efficiency.

Learn 11 powerful principles to get and stay organized
and stress-free.

Each of the 11 principles comes with a fun, hand-drawn illustration.

Swift Mind Freedom method is easy, simple, fun, and gives you
fast results.

stdl

Swift To-Do List 11

The ultimate to-do list and notes software for Windows.

Color your tasks in Swift To-Do List – The Definitive Guide

In Swift To-Do List, you can can color your tasks based on Priority, Type, Status, Context or Assigned To..

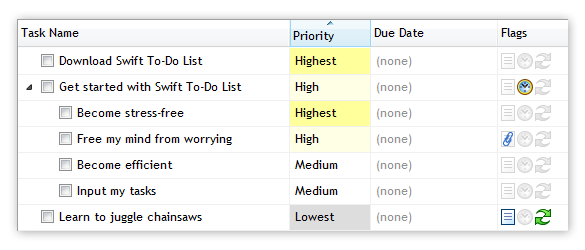
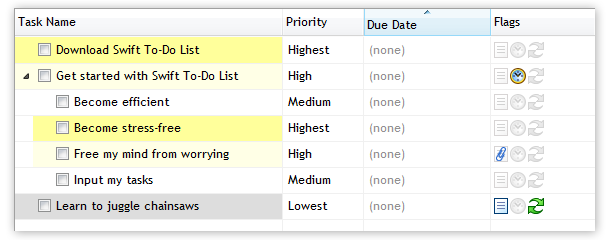
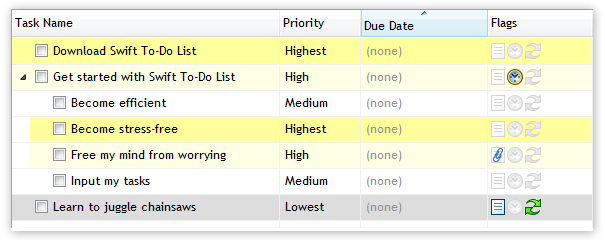
Additionally, 3 different modes are supported when coloring tasks (column, task name, whole row). That’s a lot of combinations! So let me give you an example for coloring by Priority – I will show how each of the modes looks like:

1. Color inside the Priority column:

Colors in Priority column in Swift To-Do List

2. Color Task Names (based on Priority):

Colors in Task Name column based on priorities

3. Color whole rows (based on priority):

Color whole rows in Swift To-Do List based on Priority

By default, Swift To-Do List uses colors only in the Priority column, as shown in the first example. But you can customize and use colors much more – and in this post, you will learn all about it.

How to enable or customize colors

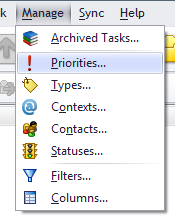
To enable or customize the colors, use the Manage menu:

Manage menu in Swift To-Do List

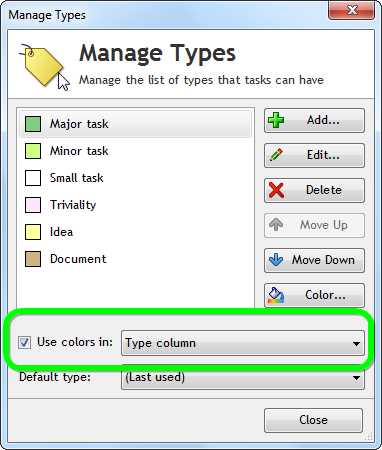
Let’s say that we want to customize coloring by Type, so we will click the Type menu item. The following Manage Types window will be shown:

Manage Types in Swift To-Do List

Very similar window would be shown for Priorities, Statuses, Contexts or Contacts (Assigned To). It works the same.

In this manage window, you can do 3 key things:

  1. Enable or disable colors, by clicking the checkbox, as shown in the screenshot above.
  2. Choose the color mode (Column/Task Name/Whole Row), as explained at the beginning of this post.
  3. Change the colors for individual items. To do that, select an item, then click the Color button on the right.

Please note that for obvious reasons, you can’t use the Whole Row or Task Name coloring mode for two or more fields at once – e.g. both Priority and Type can’t color the Task Name.

However, the Column coloring mode can be combined with any other modes of other fields – e.g. Priority can color task names (or even whole rows), and at the same time, Type can color the Type column.

Also please note, that done tasks are always displayed in gray text with no color highlights.

Your coloring customizations are of course automatically saved and remembered, even after restarting the program.

Coloring Due Dates and Start Dates

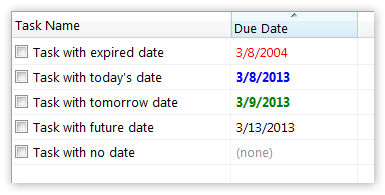
Due Dates and Start Dates can be also additionally colored in the task-view. This is how it looks in action:

Colors for dates in Swift To-Do List task-view

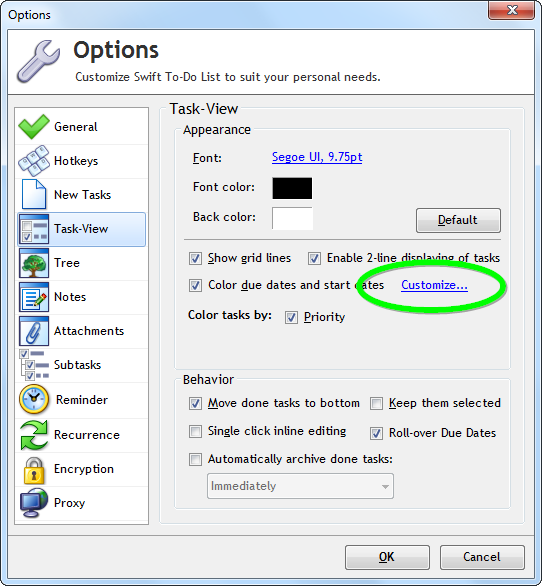
To configure this, use menu File – Options, and in the Options window, go to the Task-View section.:

Task-View Options in Swift To-Do List

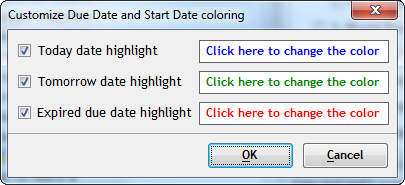
There, make sure “Color due dates and start dates” is checked, and click Customize upon this checkbox. This will display the following window:

Options for Due/Start Date colors in Swift To-Do List

As you can see, today, tomorrow and expired dates can be highlighted using a color of your choosing. The “today” and “tomorrow” dates are also displayed in bold for extra highlight.

Bonus tip for Ultimate owners: Creating a “Color” column

This is a fun trick. If you want to color your tasks yourself, and not based on Priorities/Types/Contexts/Statuses/Assignees, you will love this -

If you own the Ultimate edition, and don’t use the Context or Type column, you can rename it to “Color”. To do that, use menu Manage – Columns. In the window shown, select and enable the Context or Type column, then click the Rename button. Type in “Color” and confirm.

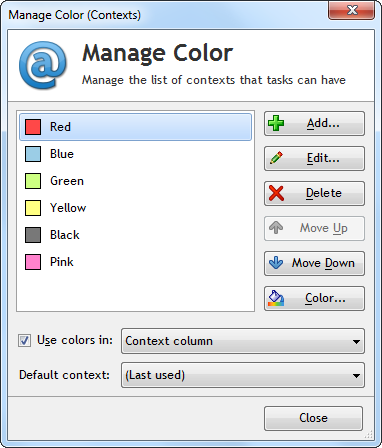
Now, use menu Manage – Colors and rename all the contexts to color names. Then set them the appropriate color. As an example, after customizing, it can look like this:

Contexts customized as colors instead

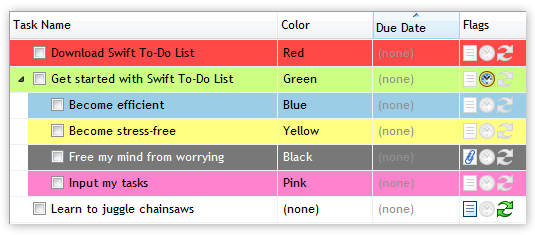
And now, here’s the fun part! From now on, you will have a new “Color” column that you can use in Swift To-Do List. For each of your tasks, you can set an optional color. The result can look something like this:

Custom colors column

Any questions or comments?

So, that’s it. Now you should be a master when it comes to using colors in Swift To-Do List.

We have a nifty little comments box at the bottom of this page – if you have a question or a comment, don’t hesitate to write something into it and click Submit comment! I will be happy to reply to all comments.

Related Posts:

stdl

Swift To-Do List 11

The ultimate to-do list and notes software for Windows.

Swift Mind Freedom

Swift Mind Freedom

Swift Mind Freedom is a method of using Swift To-Do List for
instant relief, total control and super efficiency.

Learn 11 powerful principles to get and stay organized
and stress-free.

Each of the 11 principles comes with a fun, hand-drawn illustration.

Swift Mind Freedom method is easy, simple, fun, and gives you
fast results.