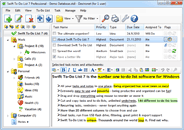
“The One Minute To-Do List” is a new organizing method by Michael Linenberger, who is also the author of “Master Your Workday Now”, which is probably the best alternative to Getting Things Done (GTD) method.
One Minute To-Do List method is perfect for people who want to quickly start using some proven organizing system, instead of doing things haphazardly and randomly on their own, or learning some complex organizing system.
One Minute To-Do List approach is very simple compared to both GTD and “Master Your Workday Now”. And since it is so simple, I will explain it to you – along with some of my own insights and remarks – and show you exactly how to use it with Swift To-Do List.
Once you read this this post, you will:
- Learn the proven One Minute To-Do List method
- Know exactly how to use it with Swift To-Do List for Windows
But what this really means to you is that you will get your workday and life under control and bring intelligent system into your to-do lists. Your to-do lists will finally help you to eliminate stress, not add to it!
I’m so glad that Michael Linenberger developed this simple method that I can now teach to you. Sure, perhaps the method could be even little bit simpler, but I believe that anything simpler probably wouldn’t work. This is as simple as it gets. Do you know the 80/20 principle? 20% of the effort will bring you 80% results – and that’s exactly what One Minute To-Do List is about.
Michael is a truly brilliant guy. This method is backed up by a real-world experience of him as a very successful coach, seminar organizer and best-selling author, who has helped 10.000s of individuals to eliminate stress and become organized. It really works, and it is proven. Michael trains employees of Microsoft, GE, GE, US Coast Guard, and other organizations. And I really believe that you can reap the 80% benefits of his expertise by learning this simple method.
We will cover 4 areas here: Prioritizing Tasks, Capturing Tasks, Reviewing Tasks, and Keeping the List Reasonable. Feel free to skip the “Why this works” box for each area, although the boxes can provide you with better understanding.
You can start using this method today. Just follow the instructions. Let’s get going!
1. Prioritizing Your Tasks
The One Minute To-Do List method works with just 3 task priorities, all based on urgency:
- Critical Now
- Opportunity Now
- Over the Horizon
The Critical Now priority is for tasks that are urgent and must be completed today. At any point, you shouldn’t have more than 5 tasks with this priority. This priority should be used only when necessary. If any action is not urgent and doesn’t absolutely have to be done today, then don’t prioritize it as “Critical Now”. It is perfectly OK to not have any “Critical Now” tasks.
Opportunity Now is for tasks that you would like to do today or this week, given the opportunity. You shouldn’t have more than 20 tasks with this priority.
Over the Horizon is for everything else. It’s great for tasks that are not concerning you right now, but that you don’t want to lose. You will revisit these later.
Why this works: Prioritizing by urgency makes much more sense than prioritizing by importance, because we tend to think that nearly everything is important. There is always some reason why any particular task is important. Yet, if everything is important, nothing really is. Also, it is the urgent tasks that are the most stressful. You simply need handle these first in any case. Mark Forster (Author of “Do-It Tomorrow”) also agrees that prioritizing by importance is a guaranteed failure. If you stop doing do the less-important things, they will eventually pile up and clog up your work.
How to implement this with Swift To-Do List: Because Swift To-Do List is very flexible, there are multiple ways of implementing this. You could either edit the inbuilt task priorities using menu Manage – Priorities, or, you could create a separate to-do list for tasks of each priority. Let’s go with the priority customization here, as that will allow you to use the to-do list tree for something else than priorities (e.g. project/area categorization).
Start Swift To-Do List (Download it if you haven’t already). Then, use menu Manage – Priorities:
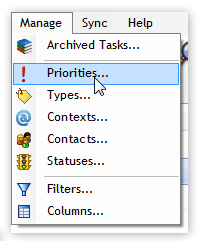
This is how the default priorities look like:
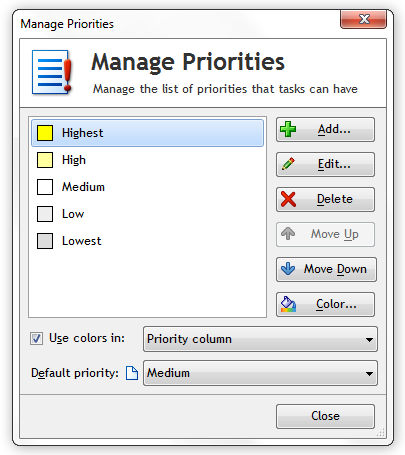
Let’s delete the “High” and “Low” priorities, so only “Highest”, “Medium” and “Lowest” remain. Then, we will rename these remaining priorities:
- Edit the “Highest” priority and rename it to “Critical Now”.
- Edit the “Medium” priority and rename it to “Opportunity Now”.
- Edit the “Low” priority and rename it to “Over the Horizon”.
This is how it should look once you are done:
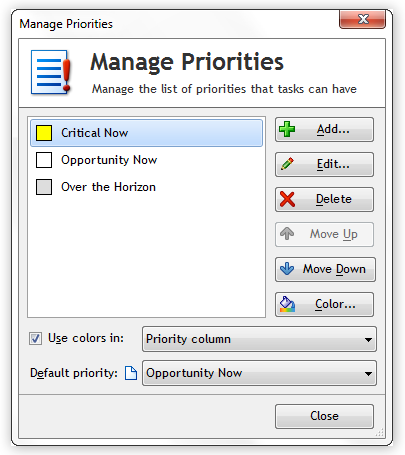
And hey, feel free to change the colors. It’s your to-do list after all!
2. Capturing Your Tasks
- Always use the next action necessary to accomplish the task as the task name. That way, all task names will be actionable. It will be obvious what you need to do to move things forward.
- All your tasks should be in one place. The best place is your computer.
- All new incoming tasks should be put into your to-do list, regardless the source (email, phone, notes from co-workers or family members, meetings).
Why this works: Having actionable task names removes friction when it’s the time to actually do the task. You won’t have to think about what’s the next step, and it will be less intimidating. Having all your tasks on your computer is important, because your computer is the place where you carry out most of your work. Even if you would have your to-do list somewhere else, you would still need it on your computer. To-do list software has many advantages over paper to-do list. You can easily re-prioritize things, easily capture new tasks, write notes for each tasks, create reminders or recurring tasks, attach files and emails to your tasks, email tasks to others, and many other advantages. If you ever need a paper to-do list, you can simply print it. Mobile devices are useful for capturing new tasks, which you can put later into your main to-do list on your computer.
How to implement this with Swift To-Do List: Not only you should put all new incoming tasks into Swift To-Do List, but you should move all your existing tasks and lists into Swift To-Do List as well. This includes any tasks you have on your phone, on paper, in text files on your computer, or in other software.
To quickly enter multiple tasks, use menu Task – Add Multiple Tasks (Ctrl + H), then enter one task per line. If your tasks are in other software or spreadsheet, you can usually export them to CSV, and then import the CSV file into Swift To-Do List by using menu File – Import Wizard.
With Swift To-Do List, it is especially simple to create tasks from emails. If you use Outlook, Windows Live Mail, Mozilla Thunderbird, Lotus Notes, The Bat, or other desktop email client, you can just drag & drop the emails into Swift To-Do List to create tasks. Here is a quick video how to create tasks from emails.
3. Reviewing Your Tasks
You should review the “Critical Now” tasks about once per hour.
You should review the “Opportunity Now” tasks once per day or more often.
You should review the “Over the Horizon” tasks once per week.
Why this works: If you review your urgent tasks often, you will feel in control, always know what needs to be done, and therefore greatly reduce stress. But it’s not enough to review just the urgent tasks, because non-urgent tasks will eventually become urgent too. You need to “catch” these before they get the chance to become urgent, and that can be accomplished with the daily and weekly reviews. Additionally, the reviews will help you to constantly re-focus to adjust your efforts. If you are focused on the right things at the right moment, you will be very efficient and productive.
How to implement this with Swift To-Do List: First, to be able to quickly review the Critical Now tasks, learn to use the global hotkey for quickly displaying Swift To-do List. This will allow you to review your tasks as often as you need. The default hotkey is Ctrl + Alt + S, and can be changed using menu File – Options. (In the Options window, it is located in the Hotkeys section.) Start using the hotkey often. It is useful especially whenever you are not entirely sure what to do next, and/or if you get distracted or interrupted.
Second, make it a habit to review your Opportunity Now tasks either when you start your workday or when you finish it.
Third, create a recurring weekly task to remind you to review all your Over the Horizon tasks. To do that:
- Click the Add Task button.
- Then, in the Add Task window, enter the task name: “Review all my Over the Horizon tasks”
- Select the Priority – this task will have the “Over the Horizon” priority.
- Go to the Recurrence tab, select “Weekly” as the interval, and in the Action dropdown, select “Set undone and remind me”. This way, Swift To-Do List will remind you once a week to review all your Over the Horizon tasks.
- Press “OK” to add the task.
4. Keeping the List Reasonable
With a little discipline, it’s easy to stick to the rules of having no more than 5 tasks with the Critical Now priority, and no more than 20 tasks with Opportunity prioriy Now. If you have more than that, simply move some tasks to the lower (less urgent) priority.
The real problem here is that your list of tasks with “Over the Horizon” priority can quickly grow out of proportions. This is a problem, because you want the weekly review to be fast and easy. No one wants to read hundreds of irrelevant tasks.
To keep things manageable, Michael Linenberger recommends using the Start Date field for this purpose. Using the following clever technique, you can defer some Over the Horizon tasks for later review. That way, your list of Over the Horizon tasks that you review weekly won’t become too long. This is how it works:
First, all new tasks should have the Start Date set to today.
Second, all tasks that have Start Date in the future should be hidden.
Third, you can start deferring tasks by setting their Start Date to future. So, if don’t want to (or need to) review some tasks for some time, then set its Start Date to a future date. This will hide the task, and when that particular future date comes, this task will start appearing on your to-do list again.
Why this works: The number 1 reason people abandon a to-do list or organizing system is because they get overwhelmed. They put in too many tasks – and the once helpful tool now just adds to their stress, instead of reducing it. That’s why it’s important to regularly delete irrelevant tasks from your to-do list, and hide things that you don’t need to worry about for now. That way, your to-do list will stay relevant, up-to-date and useful.
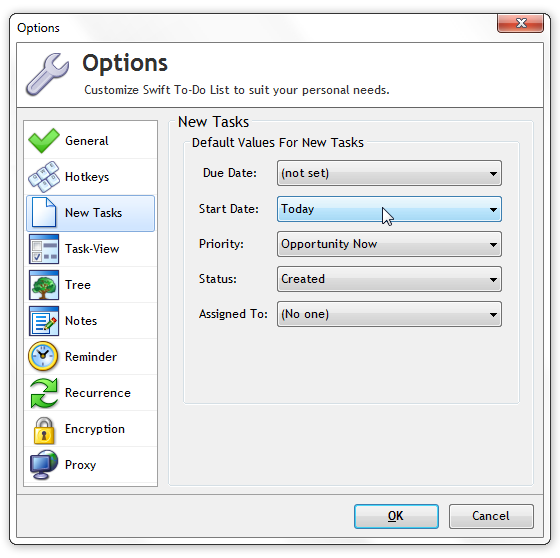
How to implement this with Swift To-Do List: First, to make sure new tasks get the “Today” Start Date automatically set, do this: Use menu Manage – Columns, and enable the Start Date field (if it’s not already enabled). Then, use menu File – Options, and in the New Tasks tab of the Options window, select “Today” upon “Start Date”, as shown below:
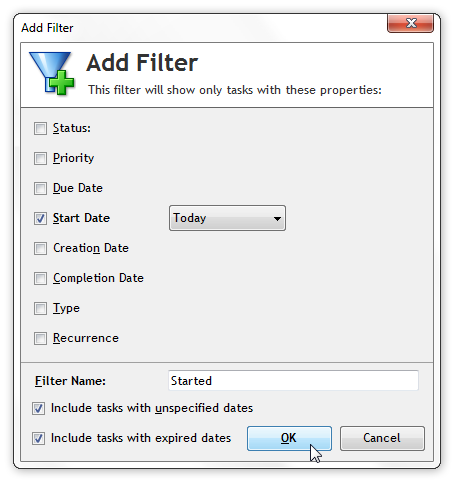
Second, to hide all tasks with Start Date set to a future date, we will create a new filter: Use menu Manage – Filters, then click Add. In the Add Filter window, check “Start Date” and select “Today”. At the bottom, check “Include tasks with expired dates” and “Include tasks with unspecified dates”. Name the filter “Started” (or anything else) and click OK:
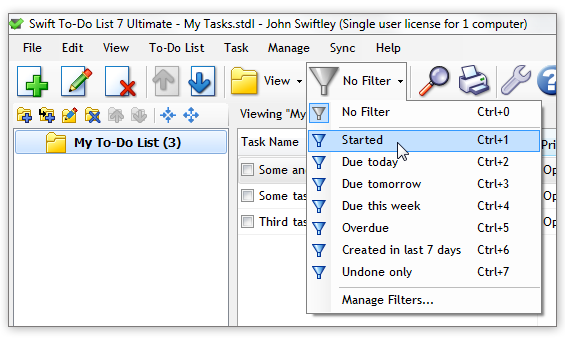
After you add this filter, apply it the main window by clicking the Filter toolbar button:
That’s the whole setup part. Now, every time you want to defer any task for a future review, edit it, and set its Start Date to the desired future review date. That will immediately hide it, and the task will start re-appearing in your to-do list on the future date.
And by the way, to move multiple tasks to another priority (e.g. from Opportunity Now to Over the Horizon), select them (e.g. using Ctrl + Click), then right-click them, and use Batch Edit – Priority in the popup menu.
And that’s it!
We’ve now covered all 4 main components of the One Minute To-Do List system: Prioritizing, Capturing, Reviewing, and Deferring. You are ready to use it. Just stick to the simple rules described in this short guide and you will reign over chaos and improve your life. For the best results, re-read this guide a week later or so once you have some experience with the system.
If you have any questions, don’t hesitate to contact me, or submit a Reply in the form below. I am here to help. I am also very much interested in your results, so don’t hesitate to let me know them once you try this.
And by the way, this is what Jason, one of our customers/fan wrote me recently as reaction to this post:
I’ve read most of your blogs over the past couple of months as I’ve been looking for ways to calm down the task crisis that I’ve had. They have been very helpful and I thank you for taking the time to post them all! The One Minute To-Do List blog [post] is what finally clicked with me and that’s when I finally broke down and bought the Ultimate Edition. I’ve been using ideas from that along with my own tweaks to help organize all the tasks I have for all the work and personal projects that I have going on. I love how I can set a new start date to review something in the future and know that it won’t be forgotten nor in the way as I focus on my current tasks.




 Since I decided to become an expert on productivity and time management and started studying these topics, I’ve run into many examples of counter-intuitive advice that actually works.