|
Quick Start |
  
|
|
Quick Start |
|
Congratulations on choosing Swift To-Do List 8! We are confident that it will become your reliable companion. This short guide will help you start using Swift To-Do List 8 immediately.
Things good to know
| • | Swift To-Do List 8 has inbuilt auto-save feature. Everything is saved automatically. |
| • | There is a lot of inbuilt tooltips. If you wonder what some feature is, then, in most cases, by holding the mouse pointer over it for a while will show you a tooltip explaining the feature. |
| • | You can undo most operations using Edit - Undo (Control+Z). The deleted tasks can be restored in Archive. |
| • | Swift To-Do List 8 comes in three editions: Home, Professional and Ultimate. The free trial is for the Professional edition by default, but you can switch it to a different edition using menu Help - Trial Edition. |
| • | Your data is sacred to us. If you upgrade to full version, higher edition, or higher version, you will NEVER lose your tasks and notes. Everything you enter Swift To-Do List 8 into will be always fully preserved. |
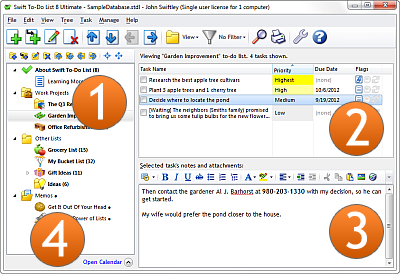
The main window
The three most important parts of the main window are: the to-do list tree, task-view, and notes panel. You can customize all of these parts in Options.
| 1. | The tree is used to organize your to-do lists and memos, and also for selecting the current to-do list. |
| 2. | The task-view displays tasks contained in the currently selected to-do list. |
| 3. | The notes panel displays notes for the currently selected task. |
| 4. | The calendar panel, collapsed by default, helps you to filter the task-view and view only tasks due on specific days. |
You can show and hide panels and toolbars using the View menu.
(1) To-do list tree
The to-do list tree panel is used to organize all your to-do lists and to select the currently viewed to-do list, which is displayed in the task-view.
| • | There is a small tree toolbar right above the tree, which allows you to add, edit, delete, and move to-do lists. |
| • |
| • | When adding a to-do list, you can either choose to create a regular to-do list or a memo. Memo's are task-independent notes in the tree. |
| • | You can drag & drop to-do lists around to organize them. |
(2) Task-view
The task-view displays tasks in the currently selected to-do list.
| • |
| • | To mark task as done, click the checkbox upon it. |
| • | You can drag & drop your tasks up and down to organize them. |
| • | You can drag & drop your tasks to a to-do list in the tree to move them there. |
| • | To edit a task, double click it, or use the Edit Task toolbar button. |
| • | To change the columns displayed in the task-view, use menu item Manage - Columns. |
| • | In Professional and Ultimate editions, you can also create subtasks by clicking the Add Subtask button or Ctrl+M. |
(3) Notes panel
You can edit and view notes of the currently selected tasks in the Notes panel.
| • | Many formatting options are available: Bold, Italic, Underline, colors, font, bullet lists, numbered lists, images, and more. |
| • |
| • | Part of the notes panel is also attachments panel, which displays files, folders, email messages, URLs, and email addresses attached to the task. The attachment panel is hidden by default, and appears only after you've attached something to the task. |
| • | You can also drag & drop files, email messages, and folders into the notes panel to attach them to the selected task. |
(4) Calendar panel
The calendar panel allows you to filter the task-view based on dates. For example, using the calendar panel, you can view only tasks due today or tomorrow.
The calendar panel is available only in Professional and Ultimate editions.
To open the calendar, click the blue "Open calendar" link below the to-do list tree. This will immediately filter the task-view, and you will see only tasks due today. Select other date(s) in the calendar to view tasks due on different date(s).
To disable the calendar filter, click the blue link again (labeled "Close calendar" when the calendar is open).
You can learn more about the calendar panel in the Calendar Panel chapter.