|
Subtasks |
  
|
|
Subtasks |
|
Subtasks support have been added in version 8. It is available in Professional and Ultimate editions.
It is one of the most useful "killer" features of Swift To-Do List 8. In its ease of use, it is unparalleled.
What are subtasks?
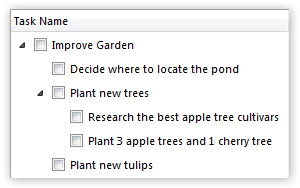
Subtasks allow you to create task hierarchy in the task-view.
Subtasks are tasks that belong under another task. They are the steps necessary for completing their parent task.
For example, you can have a task "build house", with subtasks "get building permission", "build foundation", "build walls", "build roof", and hundreds of others. Each subtask can also have its own subtasks. The "depth" is not limited.
Subtasks are exactly the same as regular tasks. The only difference is that they are located "under" another task.
Why use subtasks?
With subtasks, you can break down complex tasks into easily manageable chunks. This can dramatically boost your productivity.
By breaking complex tasks into smaller subtasks, you can reduce procrastination and make your work more enjoyable. The big, intimidating tasks will suddenly seem like small cute puppies that you can easily handle. It will be much easier to focus, as the specific next action step will be always right in front of you.
Once you lay out all the small steps in front of you, following them will be easy.
How does one eat an elephant? One bite at a time.
How to create subtasks
Creating subtasks is very simple, and, as usual, can be accomplished several ways.
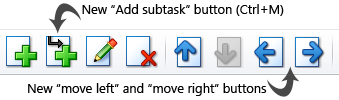
| 1. | You can create subtasks by clicking the Add Subtask button in the main toolbar, or using the menu Tasks - Add Subtask. Just make sure that you select the desired parent task first, as the subtask will be added under the currently selected task. |
| 2. | You can also use keyboard shortcut Ctrl + M to add a subtask under the currently selected task. |
| 3. | Another way to create subtasks is to use the Move Right button in the main toolbar, also available from menu Tasks - Move Right, or using keyboard shortcut Alt + Right. |
| 4. | You can also simply Drag and Drop any existing tasks onto another task to move them under that particular task. When you are dropping a task onto another one, the target task will become highlighted and the insertion marker (used for task reordering) will momentarily disappear. |
| 5. | You can also right-click any task, then select "Add Subtask..." in the popup menu. |
| 6. | Finally, you can also use the Add Multiple Tasks feature to quickly add whole hierarchical task structures (outlines) in a single step. |
Subtasks and filters
When subtask passes a filter, its parent task will automatically pass the filter too.
So, for example, if you have filter for High priority tasks only, then all High priority subtasks will be shown, including their parent tasks, even if their parent tasks are of Low priority.
Subtasks and recurrence
When a task with subtasks recurs, the recurrence action will be applied for its subtasks as well. This applies to the "Set as undone" and "Duplicate" actions.
Additionally, the Due Date/Start Date/Completion Date/Percent Done/Time Spent changes are applied to subtasks as well, if you have this enabled in the Recurrence section of the Options window. You can disable these changes for subtasks in the Recurrence section of the Options window, by checking "Don't apply to subtasks of recurring tasks" (not checked by default).
Advanced subtasks options
In most cases, changing the advanced subtasks options is unnecessary.
If you open the Options window (e.g. using menu File - Options), and go to the Subtasks section, you will be able to adjust several options related to subtasks:
| • | "Enable subtasks feature" (enabled by default) - if you disable this, the subtasks support will be completely disabled and hidden from Swift To-Do List 8. Useful only if you don't want to use subtasks at all. |
| • | "Auto-compute Percent Done from subtasks" (enabled by default) - if enabled, the Percent Done field of all parent tasks will become read-only, computed automatically from all their subtasks. |
| • | "Auto-compute Time Spent/Estimate from subtasks" (enabled by default) - if enabled, the Time Estimate and Time Spent fields of all parent tasks will become read-only, computed automatically as the sum of their subtasks Time Estimate and Time Spent field values. |
You can also adjust what happens in 4 different scenarios, when you are setting a task done or undone. By default, in all these scenarios, you will be asked what to do, then the choice will be remembered and reflected in Options.
The 4 scenarios are:
| • | "When I set a task with subtasks as done" (Should all subtasks be also marked as done?) |
| • | "When I set a task with subtasks as undone" (Should all subtasks be also marked as undone?) |
| • | "When I set all subtasks (of a task) as done" (Should the parent task be also marked as done?) |
| • | "When I set one of subtasks as undone" (Should the parent tasks also marked as undone?) |
Collapsing and expanding subtasks
There are many ways of collapsing or expanding subtasks.
You can simply click the collapse/expand button upon the task with subtasks.
Or, you can select the task, and press the right arrow key to expand it, or left arrow key to collapse it.
Or, you can use any of the following shortcuts. These shortcuts use keys on the numeric keypad area:
| • | + Expand selected tasks |
| • | - Collapse selected tasks |
| • | * Fully expand selected tasks |
| • | / Fully collapse selected tasks |
| • | Shift + Expand all shown tasks |
| • | Shift - Collapse all shown tasks |
| • | Shift * Fully expand all shown tasks |
| • | Shift / Fully collapse all shown tasks |